Difference between revisions of "Modifying an X310 Chassis for External LO Sharing"
(→Safe Mode) |
(→Steps) |
||
| Line 36: | Line 36: | ||
==Steps== | ==Steps== | ||
| − | + | # Remove the top cover of the X310 | |
| − | + | ||
| − | + | ||
| − | + | ||
| − | + | ||
| − | + | ||
| − | + | ||
==Unbricking an N-Series Device== | ==Unbricking an N-Series Device== | ||
Revision as of 13:48, 24 September 2019
Contents
Application Note Number
AN-123 Note: This AN is currently in progress and is incomplete. Please contact support@ettus if the information that you expect to be in this KB is relevant to your usecase.
Revision History
| Date | Author | Details |
|---|---|---|
| 2019-09-06 | Sam Reiter | Initial creation |
Overview
This document describes how to modify an X310 chassis to wire the LO to the backplane. Doing this will allow the user to export and import an LO signal as desired when using a compatible daughterboard such as the TwinRX. Tools and cables are not available for purchase from Ettus Research, but product recommendations are made. All modifications are performed at the user's own risk.
Product Compatibility
This guide is only for devices with following Part Numbers:
- 156485C-09L
- 156485C-10L
- 156485F-09L
- 156485F-10L
- 156485G-09L
- 156485G-10L
Cable Recommendation
Cable type: SMA (F) to Right-angle MMCX (M) Cable Assembly Cable Length: 25cm
Example Manufacturer: Cinch Connectivity Solutions Johnson Example Part Number: 415-0073-MM250
Steps
- Remove the top cover of the X310
Unbricking an N-Series Device
Required Tools
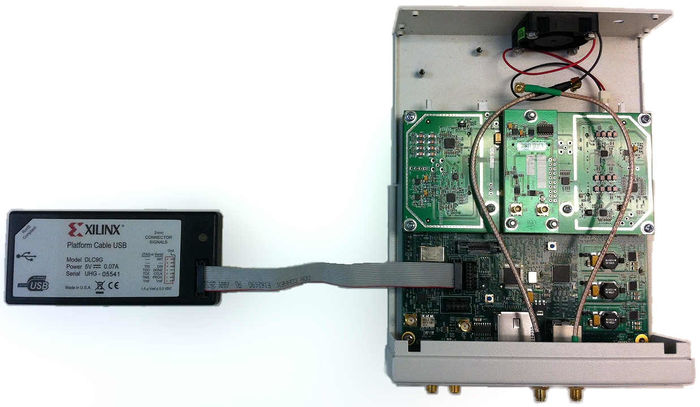
- JTAG programmer: please connect it to the JTAG connector on the motherboard as shown in the attachment
- Xilinx 'iMPACT': launch and cancel the new project wizards. You should be left with the screen which shows a single FPGA chip in the main document (auto-detected by the programmer).
Recovery Process
Download the latest FPGA images, e.g. using:
$ uhd_images_downloader
There is a sub-directory in the archive below the firmware/images called 'bit'. Use Impact to load usrp_n210_r4_fpga.bit via the programmer (the filename may be different depending on your device type and revision).
The USRP should now be able to communicate on the network (you'll see some LEDs light up and network link be established). The next step is to flash the device and program the serial number. Both these steps can be done with UHD (the JTAG step is complete).
To be sure, run uhd_find_devices and it should appear in the list - remember this IP address for the image loader utility (should be 192.168.10.2 - make sure your network settings enable to you communicate with that subnet!).
The first step is to flash the unit's safe-mode image, and then do a normal flash - both with the UHD Image Loader utility.
Make sure you have UHD installed, and the images from before, and follow the instructions in Load the Images onto the SD card (USRP2 only). You can combine the --fw-path and --fpga-path arguments into the single invocation of the image loader.
You will probably use "usrp_n210_fw.bin" for the firmware and "usrp_n210_r4_fpga.bin" for the FPGA image parameters (use the full/relative file path if your current directory is not that of the images).
$ uhd_image_loader --args="type=usrp2,addr=192.168.10.2,overwrite-safe" --fw-path=usrp_n210_fw.bin --fpga-path=usrp_n210_r4_fpga.bin
Use the overwrite-safe option the first time, and then repeat without it for the second time. Don't forget to power-cycle the device after it has been flashed.
You can change the normal IP address by following the instructions in Change the USRP2's IP address.
If you run uhd_usrp_probe, you can see the EEPROM keys at the top. Example:
Mboard: N210r4
 hardware: 2577
 mac-addr: a0:36:fa:25:34:a7
 ip-addr: 192.168.10.4
 subnet: 255.255.255.255
 gateway: 255.255.255.255
 gpsdo: none
 serial: EAR14U7UP
If you need to change any of there, you should then be able to run:
$ usrp_burn_mb_eeprom --key=<key> --val=<val>
to set the 'mac-addr', 'serial' and 'Mboard'.
Troubleshooting
Listed below are some specific things that you can check to verify whether or not your N200/N210 hardware is working correctly. If the answer to any of the questions listed below is "no", then there is probably a hardware problem.
- Does the fan spin?
- Do any of the LEDs on the front panel light up? Which ones? (http://files.ettus.com/manual/page_usrp2.html#usrp2_hw_leds)
- Are the lights on the Ethernet port flashing, when the N210 is connected to the host computer? Note that the N200/N210 must be connected to a 1 Gigabit Ethernet port. A 100 Mbps Ethernet port will not work.
- Check the voltages on these connectors on the motherboard: J105 (should be 2.5V); J104 (should be 3.3V); J107 (should be 1.2V). Do you see the correct voltages on those connectors?
- Does the LED at D203 on the motherboard light up? If you're holding the N210 such that the front panel is facing you, then D203 is located near the left connector for the daughterboard.
JTAG Hardware
In this example, the Xilinx Platform Cable USB model DLC9G was used. This or a comparable JTAG programmer should enable device recovery.
- Xilinx Platform Cable USB Datasheet: https://www.xilinx.com/support/documentation/data_sheets/ds300.pdf

