Transmitting DVB-S2 with GNU Radio and an USRP B210
Contents
Application Note Number
AN-142
Abstract
This application note will demonstrate using an USRP B210 and the GNU Radio DTV example flowgraph to transmit a DVB-S2 video stream to an off-the-shelf satellite receiver.
Overview
The GNU Radio DTV (Digital Television) module is a robust and expanding in-tree-module. It supports transmitting and/or receiving for many standards such as ATSC, CATV, DVB-T, DVB-T2, DVB-S, and DVB-S2 with numerous system modulation configurations.
Many of the blocks that make up gr-dtv have been created by Ron "drmpeg" Economos, and can be found as independent OOT (Out-Of-Tree) modules maintained at the repositories linked below. As of GNU Radio 3.7.7, these modules have been merged into mainline GNU Radio under gr-dtv.
- https://github.com/drmpeg/gr-dvbt2
- https://github.com/drmpeg/gr-dvbs
- https://github.com/drmpeg/gr-dvbs2
Required Hardware
- USRP B2xx/N2xx/X3xx
- DC Blocker BLK-89-S+ Datasheet
- 30 dB Attenuator VAT-30+ Datasheet
- SMA-to-SMA Cable
- SMA Female to F Male Adapter
- HDMI Cable
- Monitor
- DVB-S2 Satellite Receiver ( Freesat v7 ) Amazon
- Host computer with UHD / GNU Radio installation
Notes on hardware
The SMA Female to F Male adapter can be sourced from either Amazon.com or Ebay.com for a minimal amount. See the picture detail below for reference to the style that is needed. This adapter is used to convert the Satellite Receiver input from a F connector to SMA, which will then match the rest of the (SMA) cabling/connectors.
The DVB-S2 Satellite Receiver tested is marketed as a "Freesat v7" and can be source from either Amazon.com or Ebay.com. There are many inexpensive options for DVB-S2 receivers available. Consult the datasheet/manual for specific details upon which modulations they support.
WARNING: It is extremely important to always use a DC Blocker when connected to a satellite receiver. By default the satellite receivers will provide a bias-t power (typically 13-19 VDC) to power remote LNBs. Failure to use a DC Blocker will result in permanent damage to the USRP.
Required Software
- Ubuntu 16.04.2
- UHD (3.9.7 and 3.10.2.0 tested)
- GNU Radio (v3.7.10.2 tested)
Configuring the Satellite Receiver
Connect the satellite receiver to a monitor via the HDMI cable and apply power. Do not connect the satellite receiver to the USRP.
Adding a test configuration
In this step we will add an entry to the satellite list for testing purposes.
Note: If you are not using a "Freesat v7" satellite receiver, these steps will be different. Consult the user manual for your model of satellite receiver. The important settings to disable are DiSEq1.x, disable LNB Power, and disable any Motor Controls.
Apply power to the satellite receiver. After the satellite receiver has initialized, open the Menu by clicking the Menu button located on the remote.
Navigate to the section Satellite Installation. Click OK.
Press the Red button labeled M/P on the remote to Add a satellite.
Press OK to enter the Keyboard mode, and then enter in a name such as test.
Press the Yellow button labeled PVR list on the remote to Save the entry.
Select the test satellite configuration that was just created within the left side menu. Note on the right side of the screen there is various settings that can be changed.
Configure the settings as follows:
- LNB Freq: Universal (5150 - 11475)
- DiSEqC1.0: Disable
- DiSEqC1.1: Disable
- LNB Power: Off
- Motor Setup: None
Note: It is extremely important to ensure the settings are configured properly. Failure to disable LNB power can permanently damage your USRP.
After configuring the settings above, press the Exit button once. If prompted to save, select Yes. Note the icons at the bottom of the screen will change to Add/Edit/Delete/Scan.
Connecting the USRP
The cable connection from the USRP to the Satellite Receiver should be as follows:
[ USRP ] -> [ DC Blocker ] -> [ Cable ] -> [ 30 dB Attenuator ] -> [ SMA-to-F Adapter ] -> [ Satellite Receiver ]
Example DVB-S2 Flowgraph
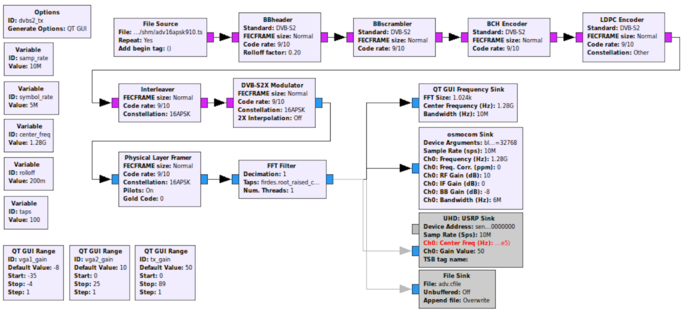
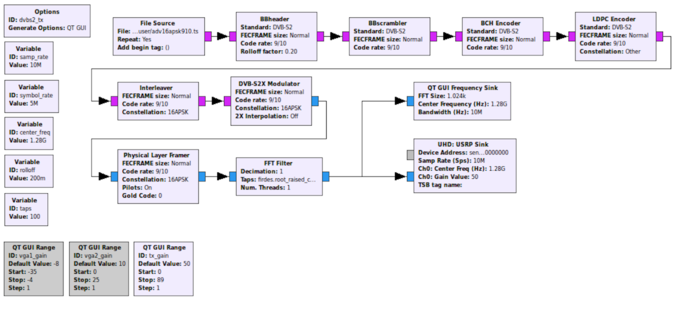
The DVB-S2 transmitting flowgraph is included by default with the GNU Radio examples. Within GNU Radio Companion's File -> Open menu, navigate to /usr/local/share/gnuradio/examples/dtv/ and open the flowgraph dvbs2_tx.grc.
Since the file is located within a directory that your user only has read-only access, you will need to save it to your home directory. From the menu, File -> Save As -> Select your home directory and click Save.
Delete the Osmocom Sink, and Enable the UHD: USRP Sink blocks.
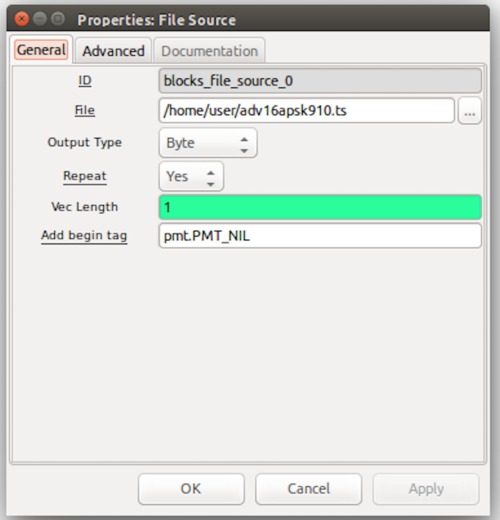
Next, we will need to update the File Source block to point to a transport stream file. By default the path is set as: /run/shm/adv16apsk910.ts.
Before we change the path within the File Source block, we will need to download the test file.
Ron Economos hosts a test Transport Stream file that matches the symbol rate, constellation and code rate for this flowgraph at the following location: http://www.w6rz.net/adv16apsk910.ts
Open a terminal window (Shortcut: CTRL + ALT + T)
wget http://www.w6rz.net/adv16apsk910.ts
After this file has completed downloading, return to GNU Radio Companion. Double click on the File Source block, and modify the path to match the location to where you have downloaded the transport stream test file.
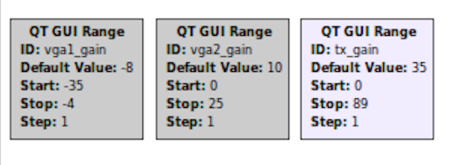
Before running the flowgraph, disable the QT GUI Range blocks with the IDs of: vga1_gain, vga2_gain.
Modify the QT GUI Range block with the ID tx_gain to have a Default Value of 35.
Next, run the flowgraph by clicking the Green Arrow within the tile menu of GNU Radio Companion.
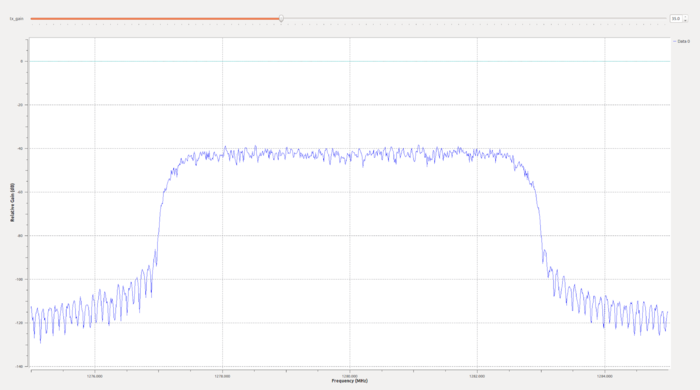
A QT GUI display should be presented with a FFT that looks similar to the image below.
Scanning for channels
Returning to the satellite receiver, select the test satellite configuration that was previously created and click the Blue button to enter the Scan menu.
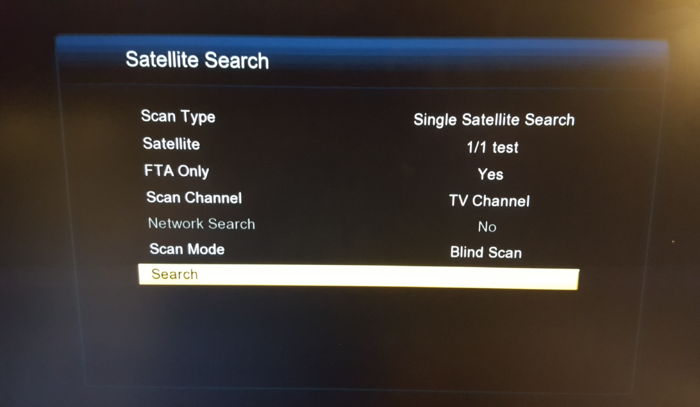
Configure the options as below:
- Scan Type: Single Satellite Search
- Satellite: 1/1 test
- FTA Only: Yes
- Scan Channel: TV Channel
- Scan Mode: Blind Scan
After configuring these options, select Search to initiate the scan. The scan may take several minutes to complete. After the scan has completed. Exit the menu.
If no channels are found during the scan, increase the TX Gain on the running flowgraph by 5 dB and re-run the scan operation. Repeat incrementing the gain if necessary until you find a gain level that produces a good signal rating as seen by the satellite receiver.
The test video should now be playing on the satellite receiver.
Encoding a Transport Stream from MP4 Video
If you would like to encode your own video for transmission, there are several steps that need to be followed.
You will first need to identify the Symbol Rate at which the the Transport Stream will need to be encoded. This is dependent upon constellation and code rate. Ron Economos has created a useful utility that will calculate the encoding rate based for most combinations of constellations and code rates.
This utility can be found at the link: https://github.com/drmpeg/dtv-utils/blob/master/dvbs2rate.c
First, the file must be downloaded.
wget https://raw.githubusercontent.com/drmpeg/dtv-utils/master/dvbs2rate.c
Next, we will compile it with the gcc compiler.
gcc dvbs2rate.c -o dvbs2rate -lm
This will produce an executable dvbs2rate.
Next, run the executable without flags to display the options:
./dvbs2rate
	$ ./dvbs2rate
	usage: dvbs2rate -sx <symbol rate>
	Options:
	    s = short FECFRAME rates
	    x = DVB-S2X rates
The short FECFRAME and DVB-S2X rates can be ignored for the purpose of this application note.
The example flowgraph, dvbs2_tx.grc, is configured as follows:
- Symbol Rate: 5000000
- Constellation: 16 APSK
- Code Rate: 9/10
- Pilots: On
We will now pass the Symbol Rate to the dvbs2rate utility as follows:
./dvbs2rate 5000000
This will output a table of transport stream rates for the combinations of Constellations and Code Rates with Pilots On and Off.
$ ./dvbs2rate 5000000
DVB-S2 normal FECFRAME
QPSK, pilots off
coderate = 1/4,  BCH rate = 12, ts rate = 2451215.758695
coderate = 1/3,  BCH rate = 12, ts rate = 3282240.689443
coderate = 2/5,  BCH rate = 12, ts rate = 3947060.634041
coderate = 1/2,  BCH rate = 12, ts rate = 4944290.550939
coderate = 3/5,  BCH rate = 12, ts rate = 5941520.467836
coderate = 2/3,  BCH rate = 10, ts rate = 6611265.004617
coderate = 3/4,  BCH rate = 12, ts rate = 7437365.343183
coderate = 4/5,  BCH rate = 12, ts rate = 7935980.301631
coderate = 5/6,  BCH rate = 10, ts rate = 8273314.866113
coderate = 8/9,  BCH rate =  8, ts rate = 8832256.078793
coderate = 9/10, BCH rate =  8, ts rate = 8943059.402893
QPSK, pilots on
coderate = 1/4,  BCH rate = 12, ts rate = 2392885.042966
coderate = 1/3,  BCH rate = 12, ts rate = 3204134.366925
coderate = 2/5,  BCH rate = 12, ts rate = 3853133.826092
coderate = 1/2,  BCH rate = 12, ts rate = 4826633.014843
coderate = 3/5,  BCH rate = 12, ts rate = 5800132.203594
coderate = 2/3,  BCH rate = 10, ts rate = 6453939.066162
coderate = 3/4,  BCH rate = 12, ts rate = 7260380.986720
coderate = 4/5,  BCH rate = 12, ts rate = 7747130.581095
coderate = 5/6,  BCH rate = 10, ts rate = 8076437.714080
coderate = 8/9,  BCH rate =  8, ts rate = 8622078.000120
coderate = 9/10, BCH rate =  8, ts rate = 8730244.576648
8PSK, pilots off
coderate = 3/5,  BCH rate = 12, ts rate = 8899953.895805
coderate = 2/3,  BCH rate = 10, ts rate = 9903181.189488
coderate = 3/4,  BCH rate = 12, ts rate = 11140617.796219
coderate = 5/6,  BCH rate = 10, ts rate = 12392807.745505
coderate = 8/9,  BCH rate =  8, ts rate = 13230059.935454
coderate = 9/10, BCH rate =  8, ts rate = 13396035.039189
8PSK, pilots on
coderate = 3/5,  BCH rate = 12, ts rate = 8697846.264756
coderate = 2/3,  BCH rate = 10, ts rate = 9678291.430116
coderate = 3/4,  BCH rate = 12, ts rate = 10887627.286654
coderate = 5/6,  BCH rate = 10, ts rate = 12111381.454447
coderate = 8/9,  BCH rate =  8, ts rate = 12929620.618185
coderate = 9/10, BCH rate =  8, ts rate = 13091826.619807
16APSK, pilots off
coderate = 2/3,  BCH rate = 10, ts rate = 13186003.683241
coderate = 3/4,  BCH rate = 12, ts rate = 14833640.270104
coderate = 4/5,  BCH rate = 12, ts rate = 15828115.408226
coderate = 5/6,  BCH rate = 10, ts rate = 16500920.810313
coderate = 8/9,  BCH rate =  8, ts rate = 17615715.162676
coderate = 9/10, BCH rate =  8, ts rate = 17836709.637815
16APSK, pilots on
coderate = 2/3,  BCH rate = 10, ts rate = 12873067.241999
coderate = 3/4,  BCH rate = 12, ts rate = 14481601.342443
coderate = 4/5,  BCH rate = 12, ts rate = 15452475.128851
coderate = 5/6,  BCH rate = 10, ts rate = 16109313.196692
coderate = 8/9,  BCH rate =  8, ts rate = 17197650.725159
coderate = 9/10, BCH rate =  8, ts rate = 17413400.455472
32APSK, pilots off
coderate = 3/4,  BCH rate = 12, ts rate = 18516475.095785
coderate = 4/5,  BCH rate = 12, ts rate = 19757854.406130
coderate = 5/6,  BCH rate = 10, ts rate = 20597701.149425
coderate = 8/9,  BCH rate =  8, ts rate = 21989272.030651
coderate = 9/10, BCH rate =  8, ts rate = 22265134.099617
32APSK, pilots on
coderate = 3/4,  BCH rate = 12, ts rate = 18116659.169291
coderate = 4/5,  BCH rate = 12, ts rate = 19331234.068076
coderate = 5/6,  BCH rate = 10, ts rate = 20152946.468736
coderate = 8/9,  BCH rate =  8, ts rate = 21514469.935523
coderate = 9/10, BCH rate =  8, ts rate = 21784375.468586
The rate we are interested in is 16APSK, Pilots On, with a Code Rate of 9/10:
coderate = 9/10, BCH rate = 8, ts rate = 17413400.455472
Rounding this value will give a rate of 17413400.
If you do not have ffmpeg installed, it can be installed on most Debian/Ubuntu based operating systems with the command:
sudo apt-get install ffmpeg
We will now use the transport stream rate above with the ffmpeg utility to convert a MP4 video into a Transport Stream file.
ffmpeg -i test.mp4 -c:v copy -c:a copy -muxrate 17413400 -f mpegts test.ts
This will create a transport stream file (.ts) that can be used within the flowgraph's File Source block. Stop the flowgraph and configure the File Source block to point to this newly created test.ts transport stream file, and restart the flowgraph.
Additional Links
1. https://en.wikipedia.org/wiki/DVB-S2
2. https://www.dvb.org/standards/dvb-s2
3. https://www.dvb.org/resources/public/factsheets/DVB-S2_Factsheet.pdf
4. https://github.com/drmpeg/gr-dvbt2
5. https://github.com/drmpeg/gr-dvbs

